I’m writing this post more as documentation for myself as I know I will be repeating this process quite a lot in coming months.
I’m currently looking at implementing token based security in .Net clients/WCF backend services. This needs a Domain with STS configured in this case I’m using Active Directory Federated Services. There are plenty of examples of doing this via configuration in WCF/ASP.Net MVC, but in this case I wanted a pure code solution in a console app to give me a better idea of how it works and what happens under the hood.
For my starting point I’ve configured 2 VM’s both running Windows Server 2012 with one configured as a domain controller and the other set to be on that domain. If you want details on getting to this position follow this blog post up to the failover clustering header.
Installing AD FS
- On the domain controller open the Server Manager
-
When you get to the screen listing the roles tick “Active Directory Federation Services”
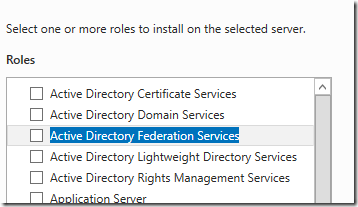
- Make sure “Include Management Tools” is ticked and click “Add Features”
-
When you get here tick the following option
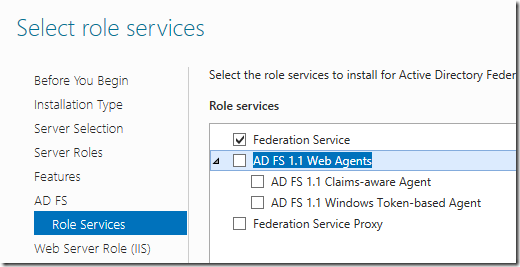
- Click next through the installer until it’s finished.
Configuring AD FS
efore we start the AD FS configuration wizard we need an SSL certificate. AD FS by default tries to use the one on the default site in IIS.
SSL Certificate
- Open IIS
- Select the server node on the left
-
Open “Server Certificates” in the features view
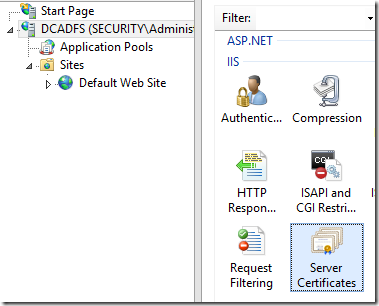
- Click “Create Self Signed Certificate”
- Choose a certificate name and click OK
- Double click the certificate you just created
- On the details pane click “Copy to file”
- Click next
- Select “No, do not export the private key” and click next
- Leave “DEF encoded binary” selected and click next
- Choose a path to save it to and click next then finish (remember this path as you will need it later)
- Click the “Default Web Site” node on the left
- Click “Bindings” on the right
- Click Add
- Set the type to https and the SSL certificate to the certificate you just created
AD FS Wizards
- From the Start Menu run “AD FS Management”
- Then click “AD FS Federation Server Configuration Wizard”
- Select “Create a new Federation Service” and click next
- Select “Stand-alone federation server” and click next
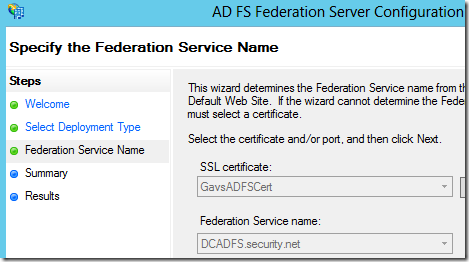
-
The certificate we just created should be automatically selected, click next
- Click next and wait for the install to finish then click close
Relying Party Configuration
Still in AD FS Management do the following…
- Under AD FS/Trust Relationships/Relying Party Trusts click “Add Relying Party Trust…”
- Select “Enter data manually” and click next
- Choose a display name and click next
- Leave “AD FS profile” selected and click next
- Leave the certificate blank and click next
- Click next without entering a URL
- Choose an identifier for this relying party (something like https://adfstest.domain.net/adfs/services/myparty) then click add and next
- Leave all users checked and click next
- Click next, then finish, then close
- You should now have the claims wizard. Click “Add Rule”
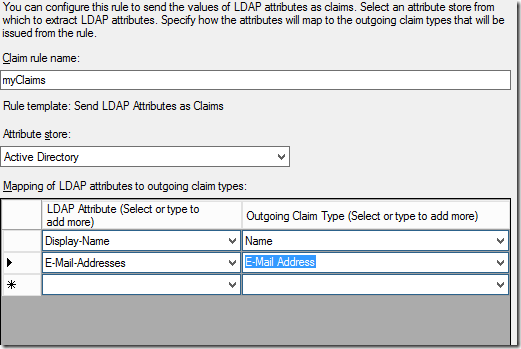
- Select “Send LDAP Attributes as claims” and click next
- Choose a rule name (MyClaims will do)
- Set the attribute store to Active Directory
-
Add a couple of mapped claims, anything that has information in Active Directory will do
- Click finish then OK
Installing The Client Certificates
Assuming you’ve followed along and created a self signed certificate we now need to put that certificate on the client machine to allow our app to communicate with ADFS. We also needs to install the AD FS signing certificate to the client machine so once we have the token we can decrypt it. *If you’ve used trusted certificates you can ignore these steps.
- On the AD FS server open “AD FS Management”
- Under Service/Certificates double click the Token-signing certificate
- On the details tab click “Copy to file” and save the certificate like you did with the last one.
- You should now have 2 saved certificates, copy them both to the other VM (The client VM)
On the client VM repeat the following steps for both certificates
- Double click the certificate
- Click “Install Certificate”
- Select “Local Machine” and click next
- Select place in following store “and click browse
- Select the “Trusted Root Certification Authorities” store and click OK
- Click next then finish
Creating a C# Console App To Use AD FS
I used .Net 4.5 and Visual Studio 2012 but I think it would be almost the same for .Net3.5 if you’ve installed the Windows Identity Foundation SDK.
- In Visual Studio create a new Console App
- Add the “Thinktecture.IdentityModel” Nuget package to the project
- Change program.cs to look like this
using System;
using System.IO;
using System.IdentityModel.Protocols.WSTrust;
using System.IdentityModel.Tokens;
using System.Linq;
using System.Security.Claims;
using System.ServiceModel;
using System.ServiceModel.Security;
using System.Xml;
using Thinktecture.IdentityModel.WSTrust;

namespace ConsoleApplication1
{
    class Program
    {
        static void Main()
        {
            const string relyingPartyId = "https://adfsserver.security.net/MyApp"; //ID of the relying party in AD FS
            const string adfsEndpoint = "https://adfsserver.security.net/adfs/services/trust/13/windowsmixed";
            const string certSubject = "CN=adfsserver.security.net";

            //Setup the connection to ADFS
            var factory = new WSTrustChannelFactory(new WindowsWSTrustBinding(SecurityMode.TransportWithMessageCredential), new EndpointAddress(adfsEndpoint))
            {
                TrustVersion = TrustVersion.WSTrust13
            };

            //Setup the request object
            var rst = new RequestSecurityToken
            {
                RequestType = RequestTypes.Issue,
                KeyType = KeyTypes.Bearer,
                AppliesTo = new EndpointReference(relyingPartyId)
            };

            //Open a connection to ADFS and get a token for the logged in user
            var channel = factory.CreateChannel();
            var genericToken = channel.Issue(rst) as GenericXmlSecurityToken;

            if (genericToken != null)
            {
                //Setup the handlers needed to convert the generic token to a SAML Token
                var tokenHandlers = new SecurityTokenHandlerCollection(new SecurityTokenHandler[] { new SamlSecurityTokenHandler() });
                tokenHandlers.Configuration.AudienceRestriction = new AudienceRestriction();
                tokenHandlers.Configuration.AudienceRestriction.AllowedAudienceUris.Add(new Uri(relyingPartyId));

                var trusted = new TrustedIssuerNameRegistry(certSubject);
                tokenHandlers.Configuration.IssuerNameRegistry = trusted;

                //convert the generic security token to a saml token
                var samlToken = tokenHandlers.ReadToken(new XmlTextReader(new StringReader(genericToken.TokenXml.OuterXml)));

                //convert the saml token to a claims principal
                var claimsPrincipal = new ClaimsPrincipal(tokenHandlers.ValidateToken(samlToken).First());

                //Display token information
                Console.WriteLine("Name : " + claimsPrincipal.Identity.Name);
                Console.WriteLine("Auth Type : " + claimsPrincipal.Identity.AuthenticationType);
                Console.WriteLine("Is Authed : " + claimsPrincipal.Identity.IsAuthenticated);
                foreach (var c in claimsPrincipal.Claims)
                    Console.WriteLine(c.Type + " / " + c.Value);
                Console.ReadLine();
            }
        }

        //The token handler calls this to check the token is from a trusted issuer before converting it to a claims principal
        //In this case I authenticate this by checking the certificate name used to sign the token
        public class TrustedIssuerNameRegistry : IssuerNameRegistry
        {
            private string _certSubject;

            public TrustedIssuerNameRegistry(string certSubject)
            {
                _certSubject = certSubject;
            }

            public override string GetIssuerName(SecurityToken securityToken)
            {
                var x509Token = securityToken as X509SecurityToken;
                if (x509Token != null &&
                    x509Token.Certificate.SubjectName.Name!=null &&
                    x509Token.Certificate.SubjectName.Name.Contains(_certSubject))
                    return x509Token.Certificate.SubjectName.Name;
                throw new SecurityTokenException("Untrusted issuer.");
            }
        }

    }
}
The top 3 lines need to be changed to match your AD FS setup.
- For the relying party id enter the id you choose when creating the relying party.
- For the adfsEndpoint in AD FS Management expand endpoints, make sure the line that contains “/trust/13/windowsmixed” is set to enabled and use that path with the server path to get the endpoint.
- The cert subject needs the subject of your signing certificate, if you’re not sure what this is put a breakpoint in the GetIssuerName method and have a look at what the subject on the certificate object is set to.
Assuming everything is set up correctly you should now be able to run the console application and get back your user details from AD FS With its associated claims.

On a closing point I highly recommend Dominick Baier’s blog for more on the subject of Windows Identity Foundation and Secure Token Services. He answered a number of my questions on stackoverflow whilst I was working on this and really knows his stuff.